


Sign-up for {N}power to get exclusive discounts, newsletters, members-only features, and more!
Making your own egg dye from natural foods is simple and fun. You can even use brown-shelled eggs—with their darker base, they enhance the color, creating a range of earthy jewel tones. Just mix up your dyes and let the eggs soak until your desired color is reached. The dye can be used to make more eggs, just be sure to keep it in the refrigerator. And remember that natural dyes stain too, so be sure to protect your egg dyeing area and clothes!
1. Make the dye: Add four cups of water to three separate saucepans; add the beets to one saucepan, the cabbage to another, and the turmeric to the third. Bring the mixtures to a boil, partially cover the pans, and reduce heat to a simmer. Simmer for 30 minutes. Note: Gently stir the turmeric mixture as it comes to a boil to prevent foam from boiling over.
2. Strain the beets and cabbage, one at a time, through a fine mesh strainer into their own glass jars or bowls. Allow the turmeric pan to rest off heat for several minutes for the powder to settle to the bottom of the pan. Slowly pour off the water into its own glass jar or bowl, leaving as much of the wet powder in the pan as possible (but don’t worry if some of the turmeric powder makes it into the dye mixture).
3. Transfer dyes to the refrigerator and allow them to cool for at least two hours.
4. Once the dyes are cool, mix two tablespoons of vinegar into each color. Then make additional colors as desired in separate jars or bowls by combining:
5. If desired, add designs by drawing on the eggs with crayons, wrapping them with tightly fitted rubber bands, or cutting designs out of tape and securely adhering them to the eggs.
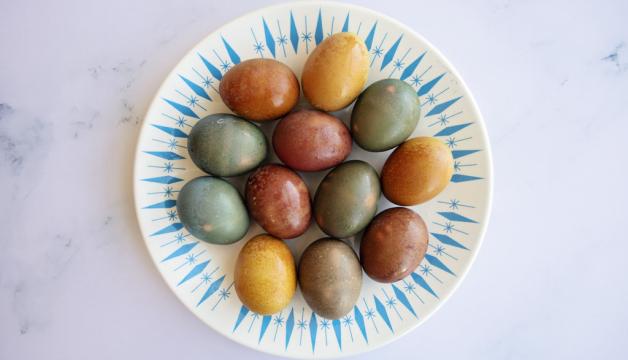
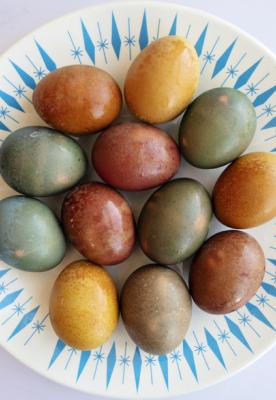
6. Dye the eggs: Gently add the eggs to prepared dyes using a slotted spoon. You can add several eggs to each dye at once, just make sure the eggs are completely submerged. Allow eggs to remain in the dye for two hours, up to 24 hours (in the refrigerator), check the color occasionally. The longer they stay in the dye, the darker the final color will be. Gently remove the eggs from the dye with a slotted spoon once your desired color is reached.
7. Allow dyed eggs to air dry completely in an empty egg carton. If you used rubber bands or tape, allow eggs to dry completely before removing. Be sure to store your dyed eggs in the refrigerator until you are ready to eat them.
1. Preheat the oven to 450⁰ F and grease a 12-serving muffin pan and four servings in a second pan.
2. Mix the hash browns, cheese shreds, and 2 tablespoons of olive oil in a large bowl until well combined. Divide the mixture among the 16 muffin cups and use your fingers to pack them tightly and shape into nests. Place in the oven and bake for 15-20 minutes, until the edges are starting to brown and the cheese has melted. When done, remove from the oven and reduce the temperature to 350⁰ F.
3. While the nests cook, cook the sausage in a skillet over medium-high heat until it is nicely browned, breaking it up as it cooks. Add the kale, stir to combine and remove from the heat.
4. Whisk 10 eggs in a mixing bowl and lightly season with salt and pepper.
5. Divide the sausage-kale mixture evenly among the 16 nests and use a ladle or measuring cup to add the eggs until full. If additional egg is needed, whisk the two remaining eggs, season with salt and pepper and add. Use a clean cloth to wipe any spilled egg around the cups. Place in the oven and bake for 13-16 minutes, or until the egg is set. Let cool for 5 minutes and gently slide a knife along the edges or use a fork to carefully lift each nest out. Serve immediately, topped with optional ingredients, or refrigerate for a grab-and-go weekday breakfast (they are delicious re-warmed for a snack, quick breakfast, or lunch).
Beverage Pairing
Taco Tuesday by Jiant Hard Kombucha
Sometimes you want a more grown-up dessert, and what could be better than adding coffee to cupcakes and frosting?! Blending Natural Grocers® Brand Organic Coffee into our Natural Grocers Gluten-Free Vanilla Cake Mix and a buttercream frosting creates a coffee lover’s dream. Worried about extra caffeine? Use Natural Grocers Brand Organic Decaf!
1. Preheat oven to 350°F. Place a parchment baking cup in 16 wells of muffin pans, greasing around the inside top of the well to allow for easier removal.
2. Beat cake mix and ¾ cup of butter in a large bowl with an electric hand mixer or in a stand mixer with paddle attachment. Add the oil, milk, coffee, eggs, and 2 teaspoons vanilla and beat with hand mixer or stand mixer on high speed until silky smooth. Fill each baking cup about three-quarters full.
3. Bake for 16-20 minutes, or until a toothpick inserted into the center comes out clean.
4. Once cupcakes are baked, remove from oven and allow them to cool in the pan on wire racks for 10 minutes. Remove cupcakes from pans and allow to cool completely on wire racks, about 15 minutes more.
5. While the cupcakes cool, prepare the buttercream. In a small bowl mix the heavy whipping cream, 1 teaspoon vanilla, and 1 tablespoon of coffee grounds together, then strain through a fine mesh strainer to remove most of the coffee grounds. In a separate mixing bowl, cream 1 cup of butter for 1 minute with a hand held or stand mixer, then add the heavy cream mixture into the butter and mix until incorporated. Add the salt, cocoa powder if using, and 1 cup of powdered sugar at a time while continuing to mix until all ingredients are blended to a smooth consistency.
6. Frost your cupcakes with the buttercream. Store covered in the refrigerator if not serving immediately.
Sign-up for {N}power to get exclusive discounts, newsletters, members-only features, and more!